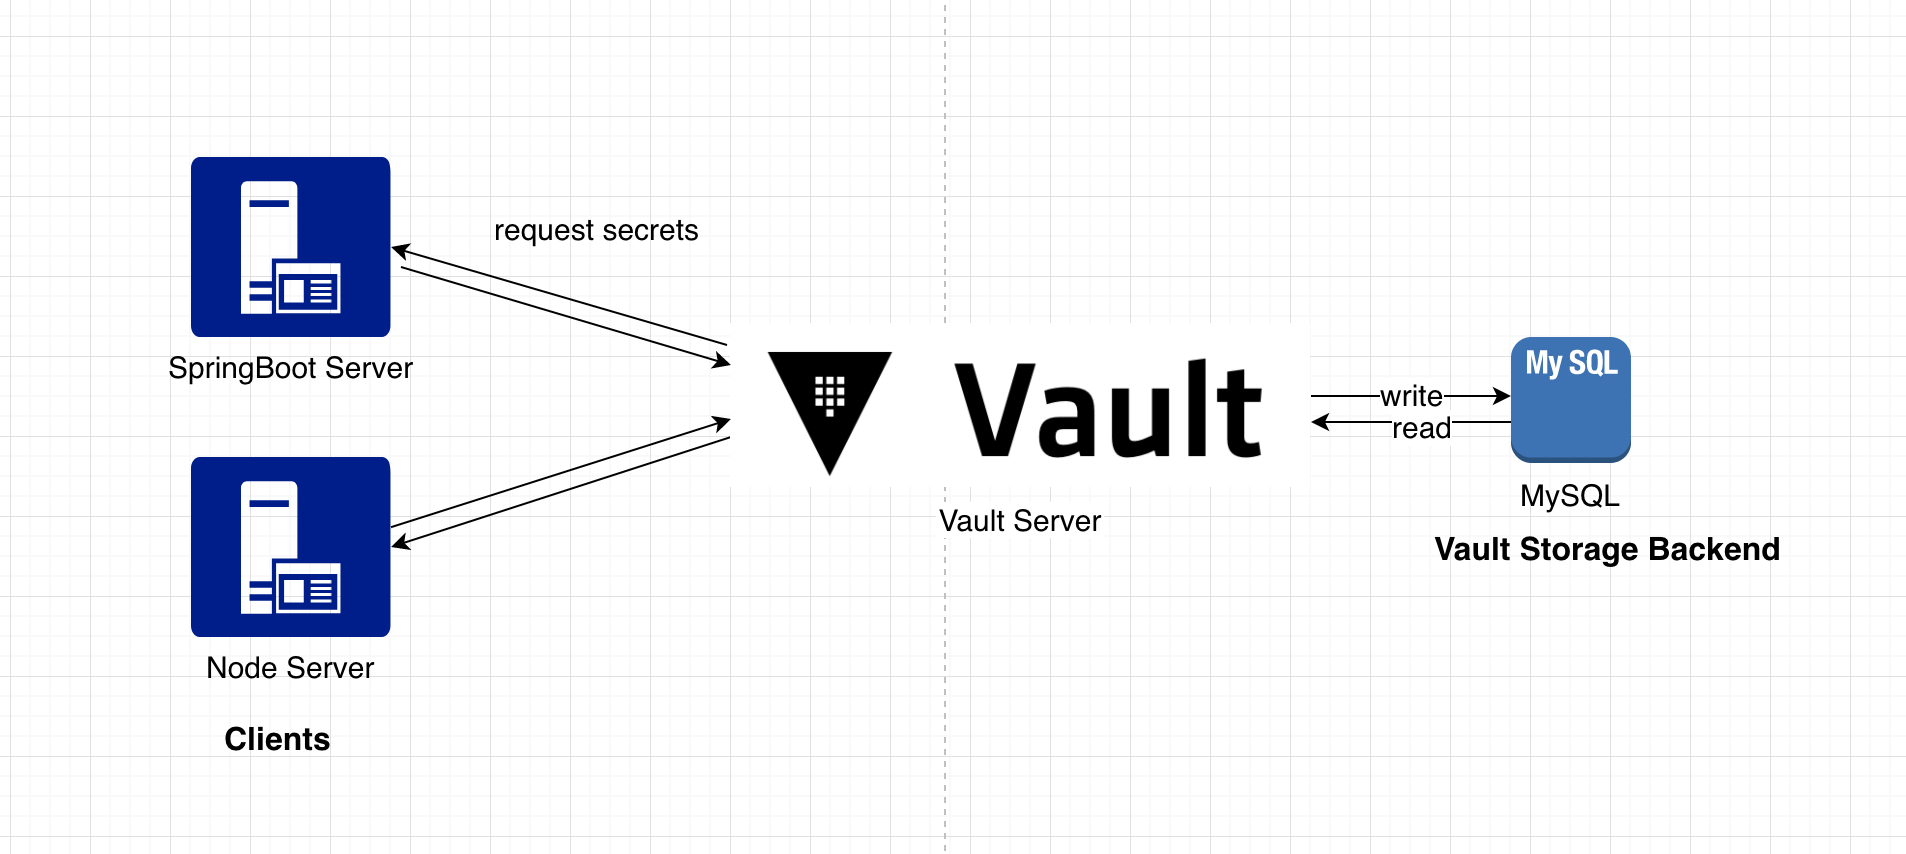
本文将搭建一个简单的Vault应用场景,其中Vault作为Secret Manager Server,并构建一个SpringBoot Server和一个Node Server作为client端,来从Vault获取相应的敏感配置信息
Vault 初始化Vault Server 首先对Vault进行配置,这里为了便于本地实验,使用http作为Vault API接口协议;使用MySQL作为实际存储数据的Storage。配置文件vault-config.hcl如下
1
2
3
4
5
6
7
8
9
10
listener "tcp" { address = "127.0.0.1:8200" tls_disable = 1 } storage "mysql" { database = "hello_vault" username = "vaultUser" password = "123456" }
创建对应的MySQL数据库与用户后,使用配置文件启动Vault Server
1 vault server -config bin/config/vault-config.hcl
初始化Vault,由于本地配置Vault使用HTTP协议,需要先设置环境变量VAULT_ADDR。Vault初始化后会输出一些key,在进行解封、重启等操作时需要用到这些key作为操作凭据
1
2
3
4
5
6
7
8
9
10
11
12
13
14
15
16
17
18
19
20
21
22
23
export VAULT_ADDR='http://127.0.0.1:8200' // export vault addr vault operator init // init vault // output Unseal Key 1: JLMr7wE+/C/mZb6rtMUVn7OKC5SBt1asZgedqJr5xwDj Unseal Key 2: kMgPPChUYh2XglK7tSEPvwmrR7pxZ6FH2VBCeLoW0d7Y Unseal Key 3: OI1ePMIEc2tiBC5O/bs4liQMpKAc4jlUI6nXth76cyBb Unseal Key 4: eymItnhLc7zUB3rmYE2x6Al+L8qUmqak6YCuaVYBCV+O Unseal Key 5: O+cO4kRbqYKPmIz2ThCmaGyyd00owHdIIL2J6G/lbWIk Initial Root Token: s.8eErick1q1cWa6ceGgnMUo4x Vault initialized with 5 key shares and a key threshold of 3. Please securely distribute the key shares printed above. When the Vault is re-sealed, restarted, or stopped, you must supply at least 3 of these keys to unseal it before it can start servicing requests. Vault does not store the generated master key. Without at least 3 key to reconstruct the master key, Vault will remain permanently sealed! It is possible to generate new unseal keys, provided you have a quorum of existing unseal keys shares. See "vault operator rekey" for more information.
Vault初始化以后会处于密封状态 (sealed),此时Vault可以从MySQL中获取数据,但是由于核心中的Barrier的保护,需要确定如何对数据进行加密/解密操作。帮助Vault确定解密data的过程即解封 (unsealing)。解封需要使用之前初始化得到的unseal key,在输入key之后得到如下输出,输入三个key之后启封
1
2
3
4
5
6
7
8
9
10
11
12
13
14
15
16
17
18
19
20
21
22
23
24
25
26
27
vault operator unseal // unseal vault // output 1 key Key Value --- ----- Seal Type shamir Initialized true Sealed true Total Shares 5 Threshold 3 Unseal Progress 1/3 Unseal Nonce 1a600752-8cee-3b7b-f2be-5c212595842f Version 1.0.1 HA Enabled false // output 3 key Key Value --- ----- Seal Type shamir Initialized true Sealed false Total Shares 5 Threshold 3 Version 1.0.1 Cluster Name vault-cluster-b517b8e0 Cluster ID 00bb2172-4cc7-1aea-cdc0-73ac4121dc87 HA Enabled false
随后就可以使用初始化得到的root token来login验证
1
2
3
4
5
6
7
8
9
10
11
12
13
14
15
16
vault login s.8eErick1q1cWa6ceGgnMUo4x // login as root // output Success! You are now authenticated. The token information displayed below is already stored in the token helper. You do NOT need to run "vault login" again. Future Vault requests will automatically use this token. Key Value --- ----- token s.8eErick1q1cWa6ceGgnMUo4x token_accessor 5WeupFwkpbbQaDY7SqxxFMZy token_duration ∞ token_renewable false token_policies ["root"] identity_policies [] policies ["root"]
另外,在紧急情况下,root用户可以以单个用户的身份重新密封Vault: vault operator seal
写入数据 使用KV Secret Engine,在secret/hello的路径下写入值为world的foo属性
1
2
3
4
5
6
7
8
9
vault kv put secret/hello foo=world // set vault kv get secret/hello // get // output === Data === Key Value --- ----- foo world
分配Policy Vault可以为特定path下的信息操作进行细粒度的控制。如下配置,将对之前写入的secret/hello级别下只赋予读操作权限,避免其他操作篡改
1
2
3
4
5
6
7
8
9
10
11
12
13
14
15
16
17
# Normal servers have version 1 of KV mounted by default, so will need these # paths: path "secret/*" { capabilities = ["create"] } path "secret/hello" { capabilities = ["read"] } # Dev servers have version 2 of KV mounted by default, so will need these # paths: path "secret/data/*" { capabilities = ["create"] } path "secret/data/hello" { capabilities = ["read"] }
加载Policy策略到Vault中
1
2
3
4
5
vault policy write my-policy bin/vault-policy.hcl // set policy to my-policy vault policy list // list vault policy read my-policy // read
这样,就可以针对这个Policy创建对应的token以供client端使用。当然,在实际使用中,Vault并不建议直接使用create指令创建token,而是通过Vault的认证方式,最终获取到client token来赋予client
1
2
3
4
5
6
7
8
9
10
11
12
vault token create -policy=my-policy // create client token // output Key Value --- ----- token s.1HwugZfXikLsAN2uglYggTxl token_accessor 2xY6oC2ZI5HzqGYJBdV1UHbc token_duration 768h token_renewable true token_policies ["default" "my-policy"] identity_policies [] policies ["default" "my-policy"]
启用AppRole 这里将使用AppRole的方式作为client向Vault发起认证的手段,AppRole可以结合Policy生成符合相应权限的client token
1 vault auth enable approle // enable
创建my-role,设定secret_id和token的有效策略
1
2
3
4
5
6
7
vault write auth/approle/role/my-role \ secret_id_ttl=10m \ // secret_id 有效期 token_num_uses=10 \ token_ttl=20m \ // token 有效期 token_max_ttl=30m \ secret_id_num_uses=40 \ policies=my-policy
获取相应的RoleID
1
2
3
4
5
6
vault read auth/approle/role/my-role/role-id // output Key Value --- ----- role_id f39adbc5-3f9e-dfec-3e23-9562dced5c2f
生成一个新的SecretID
1
2
3
4
5
6
7
vault write -f auth/approle/role/my-role/secret-id // output Key Value --- ----- secret_id 974fa891-16a8-a730-e7d0-cfd7ae547ed2 secret_id_accessor f19bb9a6-2094-19ca-0f80-27684e2e0288
随后就可以将获取到的RoleID和生成的SecretID下发给将要使用的client端使用。不同的client需要启动前可以由运维体系生成相应的secret,做到彼此隔离 (可以单独吊销某个client的secret)
Client Node.js Client 首先以一个Node Server作为client,在得到上述的认证条件后进行AppRole认证;经过Vault的login API,可以获取到新产生的client_token,作为之后请求的凭据。此处为了简便会将roleID和secretID写入到config中,实际使用时可以考虑作为环境变量动态传入
1
2
3
4
5
6
7
8
9
10
11
12
13
14
15
16
17
18
19
20
21
22
23
24
25
26
27
28
29
30
31
32
33
34
35
36
class VaultClient constructor () { this .addr = '' ; this .vault = null ; } async init() { let self = this ; try { if (!config.has('vault.addr' )) { throw { errorCode: 'E_VAULT_INIT_017' , reason: 'missing config param' }; } self.addr = config.get('vault.addr' ); let clientToken = await agent.post(self.addr + VAULT_LOGIN_ENDPOINT).send({ role_id: config.get('vault.roleID' ), secret_id: config.get('vault.secretID' ) }); if (!clientToken || !clientToken.body || !clientToken.body.auth || !clientToken.body.auth.client_token) { throw { errorCode: 'E_VAULT_INIT_047' , reason: 'failed to login vault' }; } clientToken = clientToken.body.auth.client_token; console .log(clientToken); } catch (error) { console .error(error); } } }
之后就可以根据secret的path获取需要的信息了,这里简单起见使用了node-vault作为vault client
1
2
3
4
5
6
7
8
9
10
11
12
13
14
15
16
17
18
19
20
21
22
23
24
25
26
27
28
29
30
31
32
33
class VaultClient constructor () { this .addr = '' ; this .vault = null ; } async getFooAttr() { let self = this ; try { if (!self.vault) { return config.get('foo' ) || '' ; } let result = await self.vault.read(HELLO_ATTR_PATH); return (result.data && result.data.foo) || config.get('foo' ) || '' ; } catch (error) { console .error(error); } } async init() { try { ... self.vault = Vault({ endpoint: self.addr, token: clientToken }); } catch (error) { console .error(error); } } }
这里以一个express application作为载体,在其root路径下获取foo的值
1
2
3
4
5
6
7
8
9
10
11
12
13
14
15
16
'use strict' ;const express = require ('express' );const app = express();const port = 3000 ;const VaultClient = require ('./bootstrap/vaultClient' );const vaultClient = new VaultClient();vaultClient.init(); app.get('/' , async (req, res) => { let result = await vaultClient.getFooAttr(); res.send(result); }); app.listen(port, () => console .log(`Example app listening on port ${port} !` ));
SpringBoot Client 使用SpringBoot作为Client端,依赖Spring Cloud Vault作为Vault client,只需要进行简单配置,就可以在应用bootstrap阶段自动读取Vault中的application信息,并以更高优先级覆盖本地的配置数据,做到在无侵入的情况下覆盖相关配置
配置Vault时依旧使用AppRole进行认证,这里只需要传入roleID和secretID,就可以依赖于Spring Vault的封装完成认证操作
1
2
3
4
5
6
7
8
9
10
11
12
spring: cloud: vault: host: localhost port: 8200 scheme: http authentication: APPROLE app-role: role-id: f39adbc5-3f9e-dfec-3e23-9562dced5c2f secret-id: a49d149c-5b24-b0f6-58f4-0d865d2b083c role: my-role app-role-path: approle
配置Secret Engine时,使用generic方式,这里的generic对应的是Vault的KV Engine的v1无version版本的数据,需要获取v2带有version的数据可以使用kv配置项。
1
2
3
4
5
6
7
8
9
spring: cloud: vault: generic: enabled: true backend: secret // 配置路径 profile-separator: '/' // 配置项分隔符 default-context: hello application-name: hello
Spring Cloud Vault会使用Application name和default context name来根据以下模式获取数据
1
2
3
4
/secret/{application}/{profile} /secret/{application} /secret/{default-context}/{profile} /secret/{default-context}
其中application name的优先级:
spring.cloud.vault.generic.application-name
spring.cloud.vault.application-name
spring.application.name
配置完成后,在获取到secret/hello下的foo的值之后,就可以覆盖application.yml中的自定义配置项foo
1
2
3
4
server: port: 3000 foo: default
而后在根目录请求下返回这一值
1
2
3
4
5
6
7
8
9
10
11
12
13
14
15
@SpringBootApplication @RestController public class DemoApplication @Value ("${foo}" ) private String foo; @GetMapping ("/" ) public String getFoo () return foo; } public static void main (String[] args) SpringApplication.run(DemoApplication.class, args); } }
这样,就完整构建了场景中的Vault Server,以AppRole的方式认证了两种不同的Client Server,并在各自的Client中使用获取到的配置信息覆盖了默认配置
Source Code [1] Node.js
[2] SpringBoot